
Start your first ride
Your next journey is saying hello to you. Power up your Cyclo and connect it to your MioShare account for settings and free searchable route database. With just a few steps, you can easily set up the device and be ready to go.
Connect to your MioShare account
With MioShare cloud service, it brings you more convenient cycling experience. You can easily set up your device and get inspired by MioShare App whenever you feel like starting a journey. Use the MioShare website and be creative to plan your own route.
You can enjoy seamless connection between devices with your MioShare account. Moreover, you can access to a free route database with tons of growing routes planned and shared by fellow users who love cycling as you do around the world.
Now, let's take a few steps to set up your Cyclo Discover Pal. Have your smartphone ready to perform wireless setup through MioShare App.
- Quick setup of you Cyclo device
- How to download MioShare App to complete setup process
- One click to enable hands-free notifications on your Cyclo device
- Set up "Home address" and "Favourites" through "Favourite Locations"
Key steps:
- Power up your Cyclo with a button on the top of right side.
- Choose a language and enter setup process by following the on-screen instructions.
- To connect your Cyclo to MioShare account, you need to download MioShare App with your smartphone.
- Scan the QR code on your Cyclo device's screen.
- Search for "MioShare" in Apple App Store / Google Play Store
- Scanning the QR code to download the app

- Simply click through this link: https://www.mioshare.com/applanding
- Sign up a MioShare account for the service (if you already own a MioShare account, you may sign in with existing account).
- Select your device "Cyclo Discover Pal".
- Tap "Connect".
- Tap the model name in the pop up box.
- During the pairing process, a pass key code will show on both your Cyclo device and App.
- After you make sure that the pass key code are consistent, tap the check on your Cyclo device and tap "Pair" on the App to confirm pairing.
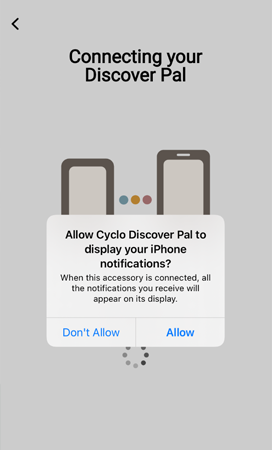
- Tap "Allow" to allow hands-free notifications. So you will receive incoming calls and messages during the ride.
- Pairing completed!
- Follow the on screen instructions on the App to do further settings and make it more personalized.
Install the MioShare App on your smartphone for free by:
* You may add/remove Cyclo device or adjust settings later on the MioShare App under Settings > Device Management.
Congratulations! Your Cyclo device is paired with your smartphone, so you now can explore more or adjust settings on MioShare App.
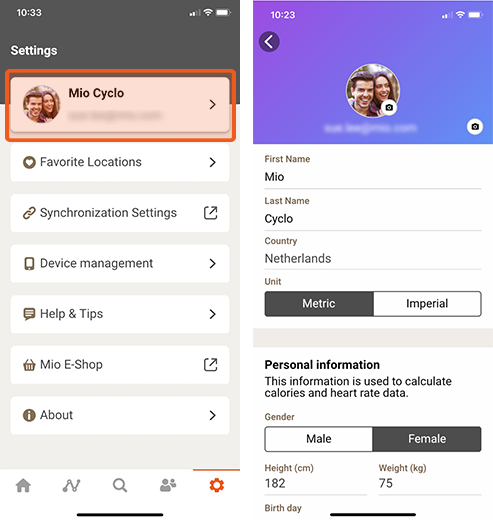
Set up user profile
After connecting your Cyclo to MioShare account, follow the instructions on device's screen and set up user profile to optimize the use of your Cyclo Discover Pal. You may also edit user profile through either through MioShare App or Cyclo device.
Use WIFI to sync changes between MioShare App and Cyclo Discover Pal. Go to "WIFI connection for wireless data transfer" below for more information about how to do WIFI sync.
- Edit through MioShare App
- Make sure your Cyclo device is connected to the MioShare App.
- Go to "Settings" on main menu of the MioShare App.
- Tap the user ID on the top (next to your profile image) to edit profile settings.
- Edit through Cyclo device
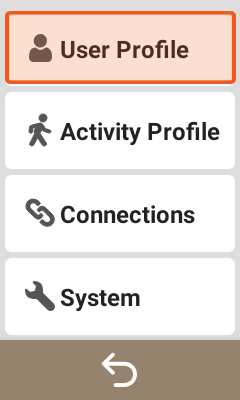
- Go to "Settings" on main menu of the device: Settings > User profile.
- Tap the item to edit profile settings.
Connect your smartphone to enable hands-free notifications
Hands-free notifications of incoming messages and phone calls
Cyclo Discover Pal allows you to receive incoming messages and phone calls. It is applicable to both iOS and Android systems.
- You can enable hands-free notifications by connecting your device to MioShare App and following the setup intructions after pairing completed.
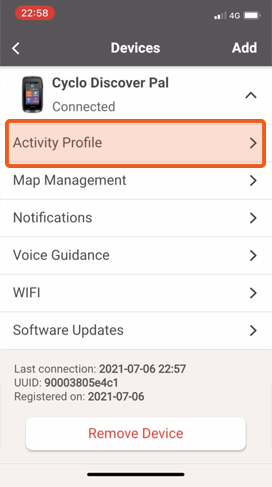
- If you want to manage the notifications, go to MioShare App for further settings: Settings > Device Management > Notifications.
Voice guidance
Your Cyclo device comes with integrated Text to Speech (TTS) technology. Connect your device to MioShare App, and it supports turn-by-turn voice guidance through your headset.
To turn on voice guidance:
- Make sure your Cyclo device is connected to the MioShare App.
- Go to "Settings" on main menu of your Cyclo device: Settings > Device Management > Voice Guidance, and make sure that the function is enabled.
*Notice:
While using voice guidance, please make sure that:
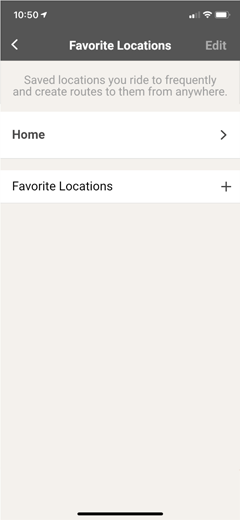
Set up "Home address" and "Favourites" through "Favourite Locations"
- Open MioShare App.
- Go to Settings > Favourite Locations.
-
Set up "Home address":
a. Tap "Home".
b. Enter home address and find the location on the map.
c. Tap "Set Home Location" to save the home address.
-
Set up "Favourites":
a. Tap "Favourite Locations".
b. Enter address or keywords to find the location on the map.
c. Tap "Save to Favourite" to save the place as your Favourites.
- If you want to edit the saved locations, tap "Edit" on the top right corner.
WIFI connection for wireless data transfer
The Cyclo Discover Pal has built-in WIFI. Through WIFI connection, you can easily transfer data including tours and history records to your device.
Let's say you have created a 'NeverMiss' route on the MioShare website or just found an enticing route idea on the MioShare App, you can download the route to your Cyclo device right away via built-in WIFI for navigation and never get bothered by finding the cable!
- Make sure your Cyclo device is connected to the MioShare App.
- Go to "Settings" on main menu of your Cyclo device: Settings > Connections > WIFI, and make sure that the function is enabled.
- Open MioShare App on your smartphone and go to "Settings": Settings > Device Management > WIFI.
-
It will automatically start to search for available hotspots nearby.
*Notice: If you are using your phone's hotspot, please beware of mobile data consumption. - Select the hotspot and enter the password.
- Tap "Join".
- Once connection is established, tap "Sync" on your device.
The data transferring process will start and the progress of each item will be shown on the device's screen, including tours data from MioShare and other route planning services supported by Discover Pal.
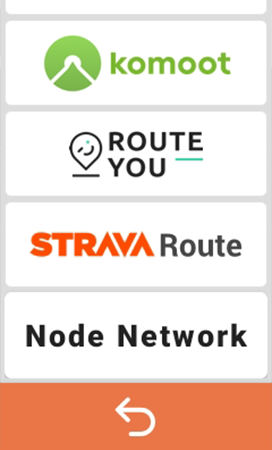
*Notice: Data will be synced from MioShare account. Connect third party services including RouteYou, Komoot and STRAVA Route to MioShare account for auto-sync.
When synchronisation is done, go to the downloaded routes from each service under "Tours" on your Cyclo device's Main Menu.
Setting the profile to choose the correct route plan
Cyclo supports various route planning options. You can simply set a starting destination or use "Surprise Me" to have Cyclo decide where you want to go.
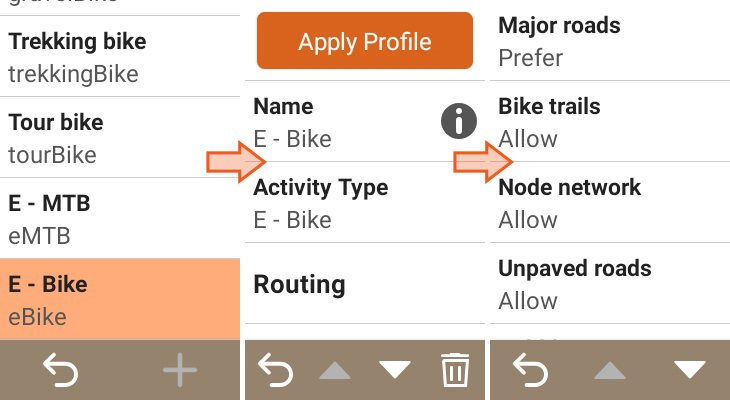
After the setup is done, you can create or change a profile for each of your activity types. Each profile can be assigned a different bike or any other activity.
Set up the activity profile to help you to categorize your activities and customize the routing methods.
To edit "Activity Profile":
-
Edit through MioShare App
a. Make sure your Cyclo device is connected to the MioShare App.
b. Go to "Settings" on main menu of the MioShare App: Settings > Activity Profile.
c. Tap your activity profile to edit profile settings. -
Edit through Cyclo device
a. Go to "Settings" on main menu of the Cyclo device: Settings > Activity Profile.
b. Tap your activity profile to edit profile settings. - Profile name: you can edit the profile name.
*Notice: You can only edit the profile name through the MioShare App.
- Activity type: you can choose among a list to set up the activity type.
- Route Attributes: the routing can be customised for each type. Tap on each item to set the route planning preferences by selecting "Prefer", "Allow" or "Try to avoid".
- Maps: you can edit the settings to customize the map view.
For information about default route plan settings, see the following table:
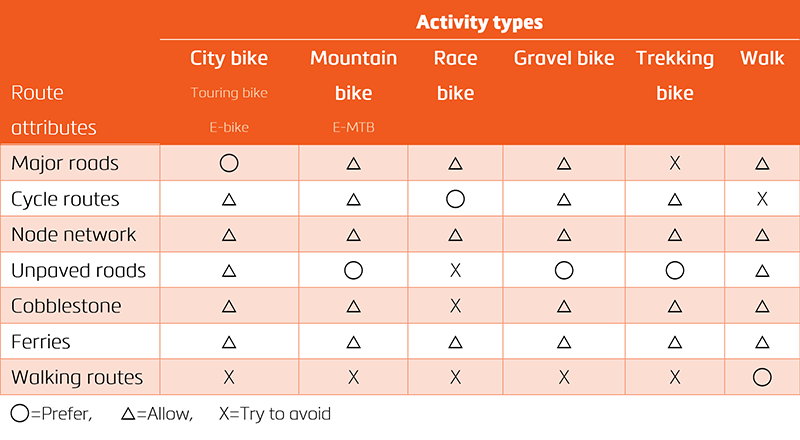
Routing option table
Navigation
If you know where you want to go
Your device is equipped with maps that provide street information for navigation, including POIs (places of interest) such as bike shops, restaurants, emergency stations, and more.
If you choose "Navigate", there are several ways to choose your destination.
Navigate to home
If you want to navigate home for the first time and have not yet entered a home address yet, you can set up "Home address" through MioShare App.
- Make sure your Cyclo device is connected to the MioShare App.
- Go to "Settings" on main menu of the MioShare App: Settings > Favourite Locations > Home
As soon as your home address is stored, simply press "GO" on the Cyclo device's screen and you will be navigated home as quickly as possible.
Navigate to Favourite
You can set up "Favourite" through MioShare App.
- Make sure your Cyclo device is connected to the MioShare App.
- Go to "Settings" on main menu of the MioShare App: Settings > Favourite Locations > Favourite Locations
As soon as your favourite locations are stored, simply pick one as destination and press "GO" on the Cyclo device's screen. You will be navigated to the place as quickly as possible.
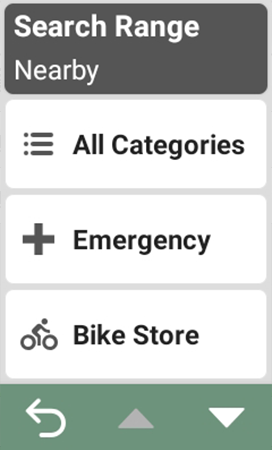
Search for places of interest (POI)
You can start with "Search Range" on the top to set the preference based on "Nearby" or "City".
Nearby: Search for POIs near your current location
City: Search for POIs in a specific city
You can either explore POIs in "All Categories" or access to the most common categories that have been listed for you in advance are: Emergency, Bike Store, and Food & Drink.
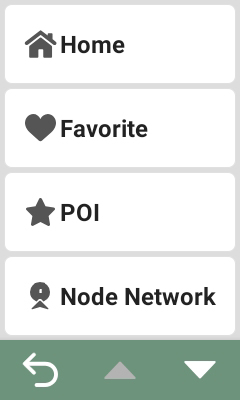
Navigate by Node Network (advanced knooppunten)
If you like cycling by numbers, Node Network (advanced Knooppunten) function helps you easily replicate the routes you read on a magazine in Netherlands, Belgium and Germany.
You can enter the nodes on your Cyclo device without the hassle of using other devices to draw a route!
To set up Node Network route:
- Go to "Navigate" on Main Menu of your Cyclo device.
- Select "Node Network".
- Prepare the knooppunten route which you found on the magazine or any source.
- Set up the "Search Range".
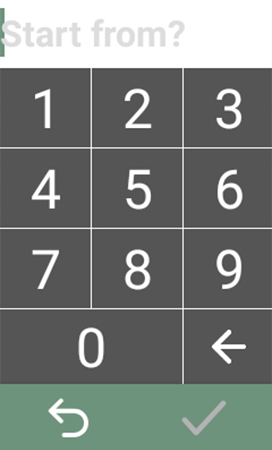
- Back to previous page and tap "Type In".
- Enter the first node number for the start point and select a node.
- It will automatically provide you a list of nodes.
- Scroll and find the next node number to finish the route.
- Once it is finished, tap the check to preview the route and save it to "Tours".
To preview the saved Node Network route:
- Go to "Tours" on Main Menu of your Cyclo device.
- Choose "Node Network".
- You can see a list of saved Node Network tours.
- Tap the route name to learn the route information.
- The arrow on the bottom leads you to next page and get a map preview.
- On next page you can even manage the nodes.
*Notice: - You may save the Node Network tour in advance. But only if you are within the 200 km range from its start point, you can start navigation.
- The function supports route length up to 200 km. If it goes beyond that, please remove some nodes to shorten the total length.
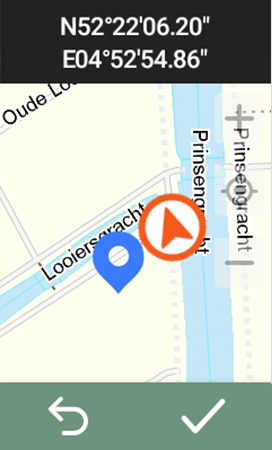
Navigate to a point on the map
You can define a destination simply by marking a point on the map. If you don't know the exact address or coordinates, this is the easiest way to get to your destination.
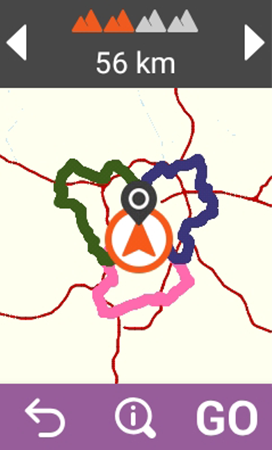
Let yourself be inspired - Surprise Me™
The device has the Surprise Me™ function, which will offer you up to three exciting routes around your location.
If you have already taken a route from the same location, the device will try to suggest different routes based on the possible and available roads around your current location. So you will always be offered different routes.
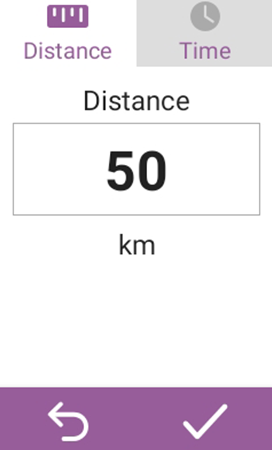
To start Surprise Me™:
- Press the "Surprise Me" button on the main menu of your Cyclo device.
- Take "Loop" as an example.
- Set by Distance or Time.
- Enter the total distance or total time you want to travel.
- Tap GO, and let your Cyclo calculate the Surprise Me™ routes for you.
- If you want to learn more about Surprise Me™ functions, please refer to our "How to" video.
Mark your location
You can mark your current location as a POI by simply hitting the "LOCATION" button on the side of your device.
Instantly save a location as your favorite and revisit again.
Customize the map view
The map display impacts the navigation experience. It can be adjusted by the Maps setting.
To edit the Maps setting:
- Make sure your Cyclo device is connected to the MioShare App.
- Go to "Settings" on main menu of the MioShare App: Settings > Activity Profile
- Tap your activity profile to edit profile settings
- Tap "Maps" to adjust settings.
Auto zoom: Enable or disable automatic zoom during navigation (If selected, the map screen automatically zooms in or out, depending on your speed, for an optimal view of your route).
Orientation: Toggle the map view to be North up or Track up.
Contours: Enable or disable the contour lines.
*Notice: You can also edit Map settings on Cyclo Discover Pal. Please check out user manual for more information.
Get a perfect tour
Before you get on the road, you must have to start with routes.
You can either quickly find routes ideas from MioShare App with free searchable database, or be creative and plan your own tour through MioShare website.
Find routes
Try the free searchable database of MioShare App for route options!
Get recommended by MioSelect:
- Open MioShare App.
- There are MioSelect routes recommended by Mio for some popular options on the dashboard.
- Tap on the card and find out more details of the route at a glance.
- Tap the dots on the top right side.
- You will get options to export GPX files or save it to "Tours".
If you are looking for some more customized ideas, try the "Find" function on MioShare App:
- Open MioShare App.
- Go to "Find" on the bottom toolbox.
- Tap the filter icon on the top bar.
- You can set the conditions according to your preferences regarding country, month, activity type, and even the length. With the filter, you can find the most applicable routes created and shared by other users through MioShare database.
- Zoom-in to explore more routes around this area.
- You may also check out the route details by tapping the route.
- Export the GPX file or save to "Tours" for you to use.
If you have a Cyclo WIFI model, you can later download the saved route to your device through WIFI sync.
*Notice: Please check out "WIFI connection" section for more information.
And the route which you chose will be ready for you to start the journey right away!
Once the routes are downloaded to your Cyclo device, you can preview them in "Tours".
- Go to "Tours" on Main Menu of your Cyclo device.
- Choose "MioShare".
- There will be a list of downloaded routes.
- The stars icon beside the route name indicates that it is a NeverMiss route.
*Notice: Please check out "NeverMiss" section for more information. Currently only MioShare and RouteYou tours support NeverMiss function. - Tap the route name to learn the route information.
- The arrow on the bottom leads you to next page and get a map preview.
- On next page you can even manage the NeverMiss stops.
Plan your tour
Whether you are cycling through small villages in rural France, exploring the sights of a big city like Amsterdam or driving through the Swiss Alps - with the new 'NeverMiss™' function you can plan your tour optimally.
To start planning a tour route:
- Go to www.mioshare.com
- Log in. If you don't have a user account yet, create a new user account.
- Go to Explore tab and choose 'Create' to go to the create page
- Learn more about how to create a tour with “How to” video
Create a new route
Simply draw a route from A to B
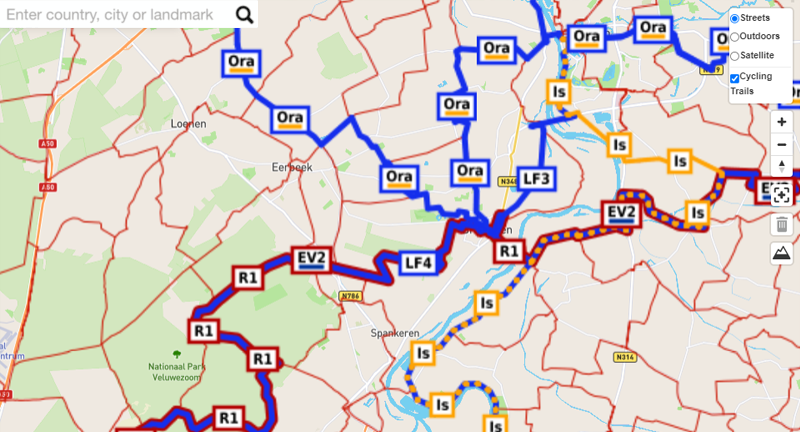
Don't know where you want to go? The Cycling Trails function can help you with this.
Using Cycling Trails:
- Click on the icon at the top right corner of screen
- Tick on 'Cycling Trails' box.
You must zoom in on Nodes to see numbers. The Node Network is popular in the Netherlands, Belgium and part of Germany.
Or you can use the search box to search for a place of interest or city to start.
Drawing a route:
- Click on the desired location on the map to select the starting point.
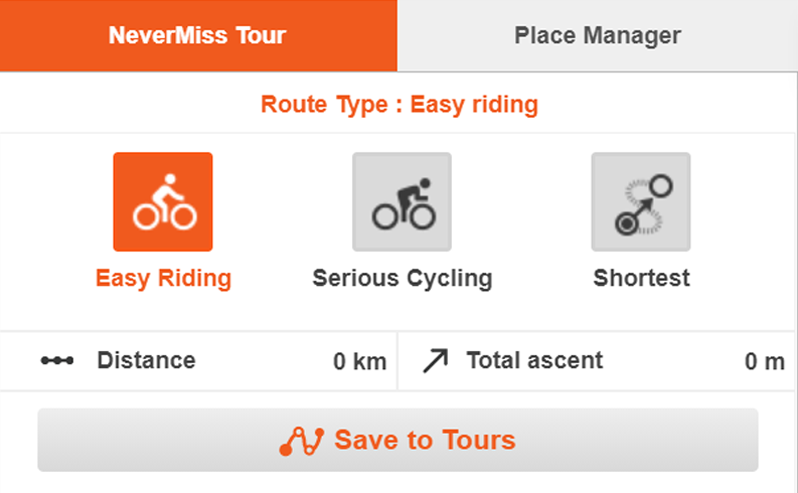
- Click on another location to create the second point.
- A route is generated accordingly to the 'Route type setting'. You can choose between Easy riding, Serious cycling or Shortest route. You can include the elevation profile to select the type you want.
The MioShare routing module ensures that you can ride on a safe bike route. Don't worry, you won't be navigated onto highways.
If you’re not satisfied with the automatically generated route through the route generator. You can easily adjust it.
Customize a route:
- When there is a pink route line displayed on the map, you can use the mouse to move along the route, it will show a white dot.
- Drag the white dot to adjust the route.
To save a route:
Click the "Save to Tours" button to save the route under Tours.
You can edit the route again at any time.
Edit the route again:
- Find the created route on the "Tours" tab. Click on the name to open the route information page.
- Click the "Edit" button in the upper right to activate edit mode.
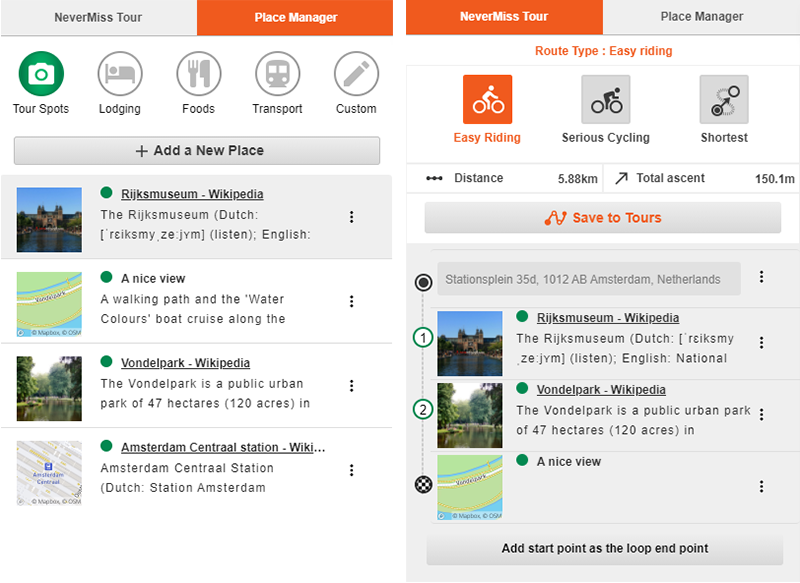
Draw a route with multiple stops:
There is a list on the left side of the Create page. Every pinpoint that you draw on the map generates a waypoint on the list. Only if you have categorized the item will it become a POI. The POI becomes the stop and your Cyclo device alerts you when you approach the site with the NeverMiss™ function.
Editing waypoints:
There are five predefined categories to choose from:
- Tour spot
- Lodging
- Food
- Transport
- Custom
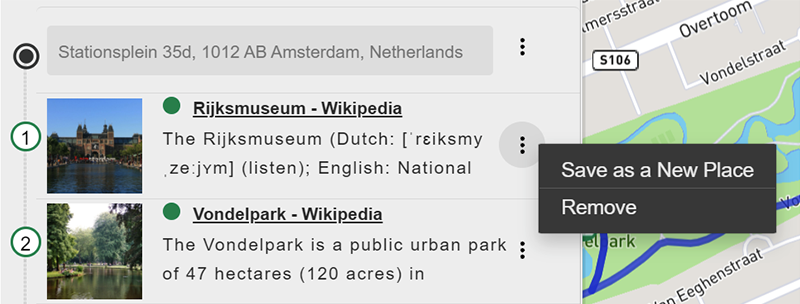
Each waypoint you created on the map shows the address or longitude / latitude of the waypoint. Click the three dot button to save the waypoint as a new place.
Place manager
Place Manager allows you to create your own POIs. It is useful because you can re-use those places while creating a route.
To add a new place:
- By clicking the Place Manager you can switch the function if necessary.
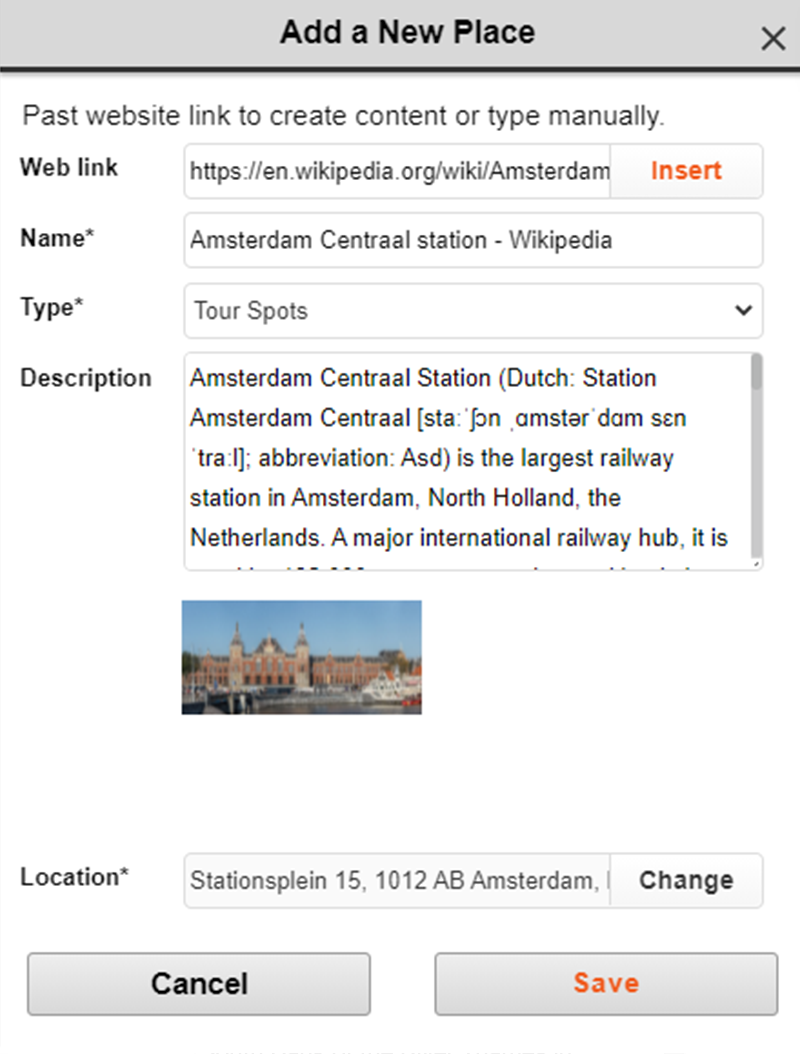
- Click the 'Add a New Place' button
- Enter required fields, they are marked with * sign.
If you found a location information online, such as a wiki or someone's blog post, you can simply copy and paste the link to the Web link column. Clicking the Insert button, will automatically retrieve Name and Description from the website for you. Some websites may not support this function.
NeverMiss™
NeverMiss™ ensures that you don't miss any important points during the tour. If you have created routes with POIs or downloaded routes from RouteYou with MioShare, Cyclo will notify you as soon as you approach the defined points during your journey.
This is very useful for self-guided tours. It turns your Cyclo into a bike notebook.
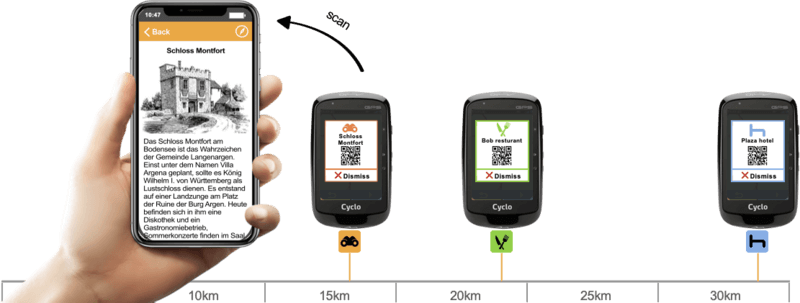
If the POI contains a web link, you will receive a QR code with the NeverMiss™ notification. Scan the QR code with your smartphone to get a detailed description over the Internet.
Scan a QR code with your smartphone:
Open your camera app and point your device at the QR code for a few seconds. When a notification is displayed, your smartphone can automatically scan QR codes. You may need to select the mode on the camera screen to activate the QR code scanning function.
The automatic QR code reader is only supported by Android 9 or higher versions and iOS 11 or higher versions. If your smartphone has a lower version, you need a third-party QR code reader app to scan QR codes.
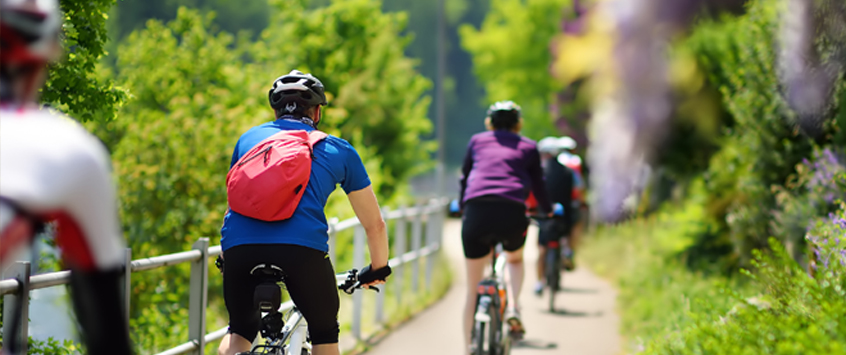
Group ride
With WeJoin™, you can start a group ride, and invite friends and family to join.
Others can also join the group ride as a follower through downloading MioShare App.
You can share the route with others with just a click.
During the ride, group members share real-time locations to freely catch up to the group and store memories together.
*It requires at least one Discover Pal to initiate WeJoin™ group ride.
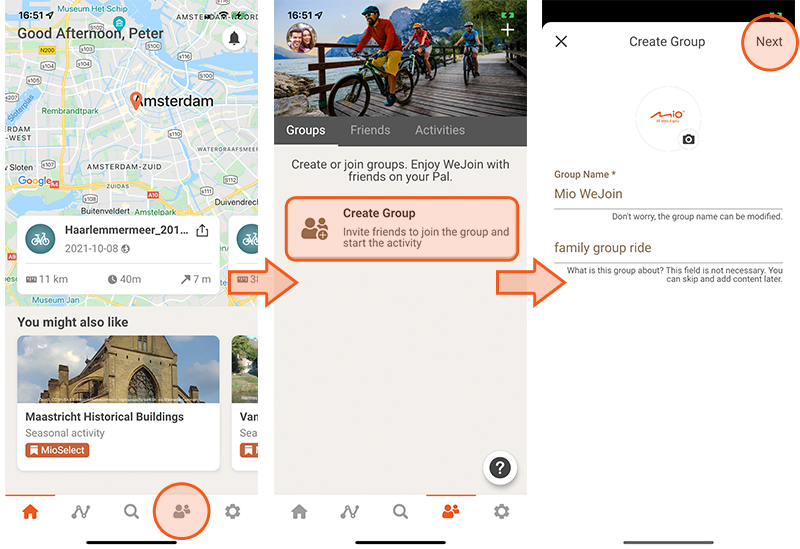
How to start a WeJoin™ group ride
(Only Discover Pal users can initiate WeJoin™ group ride)
- Be prepared with your Discover Pal and smartphone to start the WeJoin™ group ride.
- Make sure your Discover Pal device is connected to your smartphone through MioShare App.
- On MioShare App, find "WeJoin" in the bottom toolbox menu.
- Tap "Create group" or the "add" icon at the top right corner to create a group.
- You can add a profile picture, a name, and descriptions to the group.
- Tap "Next" to complete the process.
- Select friends who you would like to invite.
* Make sure your software is updated through WIFI update. Please check out the "WIFI connection" video for more information.
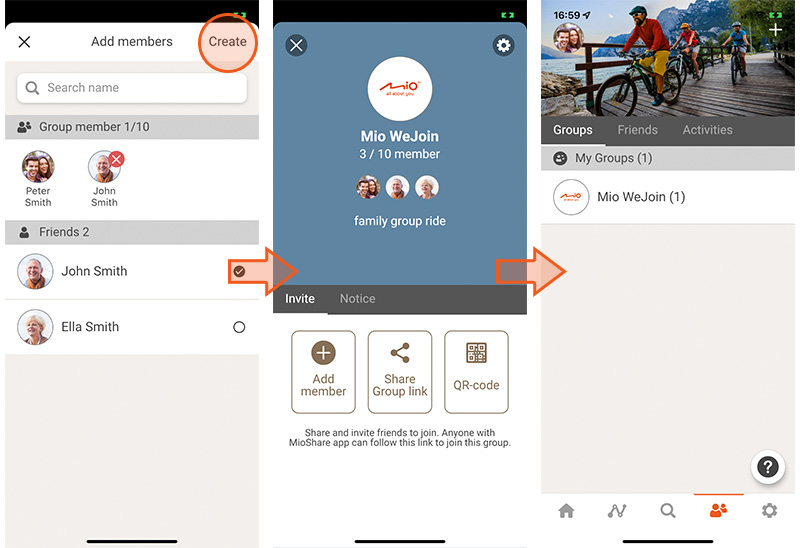
What if some of your friends do not have a Cyclo Discover Pal?
No problem! Anyone with the MioShare App can join your group and be a follower.
You can search for new friends with MioShare IDs or select them in your friend list below.
- After the group is created, members will receive invitations through MioShare App.
- Manage the group by tapping the gear icon on the top right.
- Invite more friends by sharing group link or let a friend scan the QR code.
- And then, go to "WeJoin" in Main Menu of your Pal device.
- Make sure you have the Discover Pal paired with your phone the entire time during the journey.
- Select a group and create WeJoin™ activity.
- Choose the way you want to start a WeJoin™ activity with your friends.
- The WeJoin™ route is being shared with your friends.
- Tap the check and start the ride.
- Live tracking allows you to follow the track and know where other members are.
How to join a WeJoin™ group ride
(Anyone with the MioShare App can join and be a follower)
You will receive an "WeJoin™" invitation from your friend. Accept the invitation through MioShare App.
Choose to use Pal or MioShare App to join the activity.
- If you are a Discover Pal user…
- Tap "Send & Join on Device". Use Discover Pal to enjoy turn-by-turn guidance.
- Make sure you have Discover Pal paired with your phone at all times during the journey.
- Download the route shared by your friend to your Discover Pal and start the ride.
- On your Discover Pal you can see real-time locations of other group members.
- If you are a MioShare App user (without a Discover Pal)...
- Tap "Join on APP".
- Select your bike type and join the ride.
- With the MioShare App, you can see joined members and trip overview.
- Live tracking allows you to follow the track and know where other members are.
About WeJoin™ activities
- The WeJoin™ activity will last for 48 hours since it was created. You can manually end the activity which is created by you; otherwise, the activity will automatically end after 48 hours.
- During the WeJoin™ activity, make sure that your Cyclo is connected to the smartphone via the MioShare App, and the smartphone is Internet-enabled.
- With your Cyclo, you can easily navigate the tour by visual instructions such as turn-by-turn navigation.
- On the MioShare App, you can tap
 to take photos during the tour.
*Notice: The turn-by-turn navigation is available only when you use a Cyclo Discover Pal.
The members without using Cyclo device can navigate the tour by following the track on the MioShare App.
All the members joining the activity will be displayed on the map screen of the Cyclo device and the MioShare App. The location of the members will be updated every 20 seconds.

Advanced practice
Hiking
The Cyclo Discover Pal has a height graphic in combination with a map view. You can check the height of your current location while navigating.
How to start the hiking navigation?
- Please make sure you already set your Profile to Run & Walk.
- Set a destination by Navigate.
- Or use Surprise Me™ to let Cyclo decide routes for you.
Fishing
How can you use Cyclo for fishing?
- You can save your favorite fishing spot on MioShare via the 'Create' function at Place manager.
- Create your fishing route.
- Save it on your Cyclo device via WIFI sync.
- Start your fishing route with Cyclo device through NeverMiss™.
Wildlife Observing
How do you use Cyclo to observe wildlife?
- Find a tour or observation points in magazines, travel guides or on the Internet.
- Plan your tour with the MioShare 'Create' function.
- Transfer them to your Cyclo via WIFI sync.
- Your Cyclo uses the NeverMiss™ function to notify you when you are approaching the observation point.

Connected services
Connecting to Komoot, RouteYou or STRAVA Route service
To get more routes, you can connect MioShare to Komoot, RouteYou or STRAVA Route through either App or website.
MioShare App
During first setup, you can connect your device to MioShare App and following the setup intructions after pairing completed for connected services.
If you want to manage the connected services, you can follow below steps:
- Log in MioShare App
- Go to Settings (the wheel icon on the bottom toolbox)
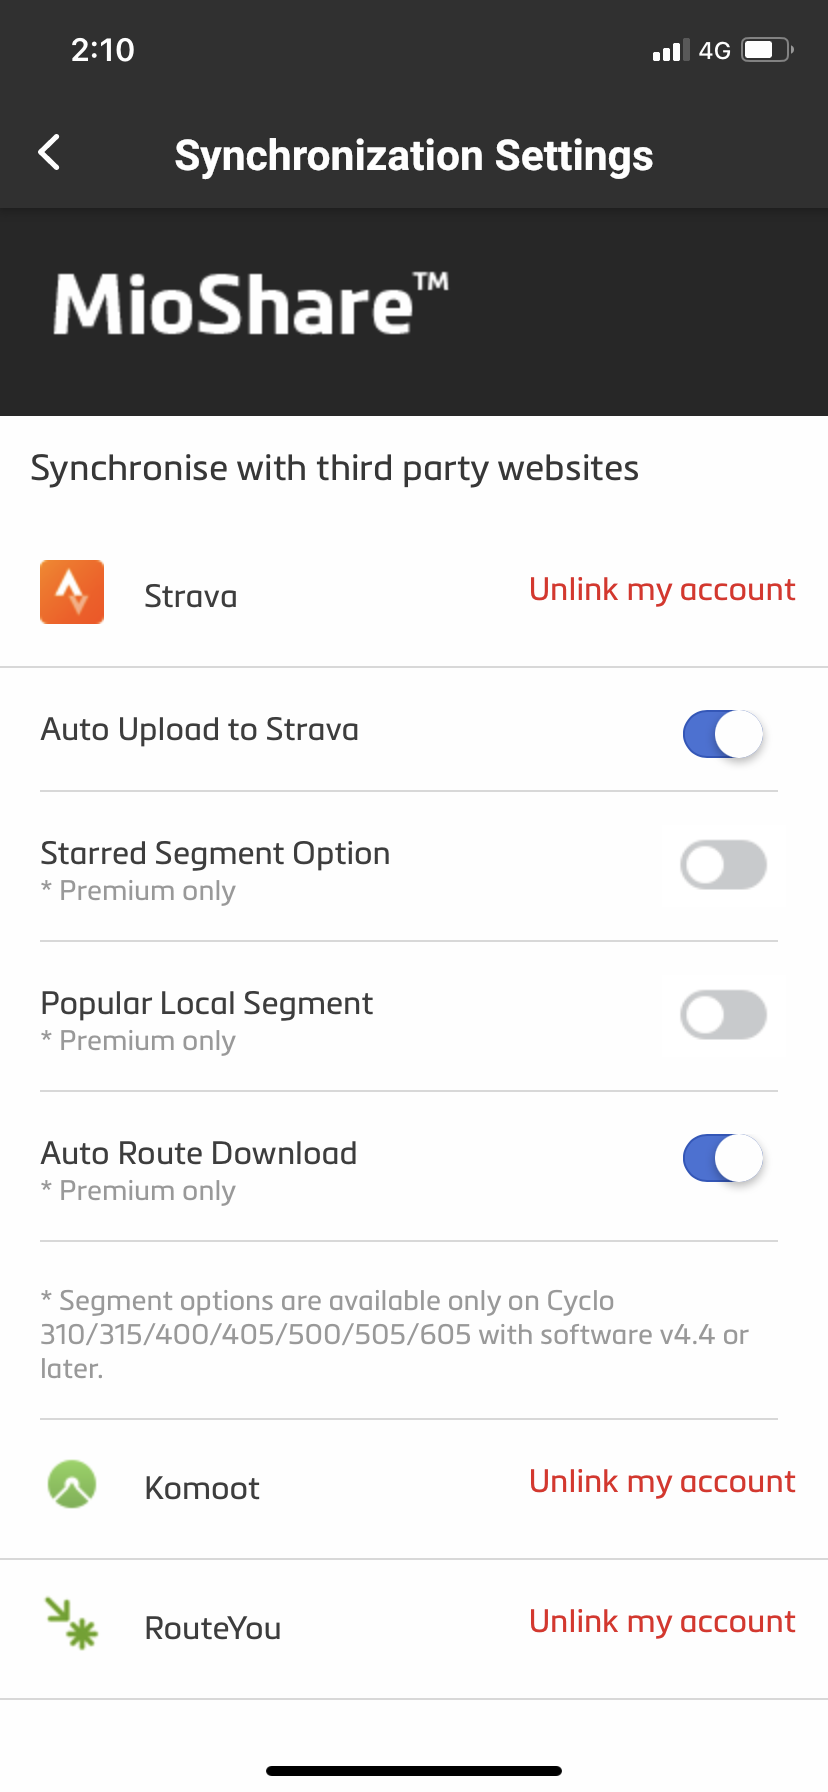
- Select the Synchronization Settings
- Link to your Komoot/RouteYou/STRAVA account by following the instructions.
* For STRAVA users, please make sure that the "Auto Route Download" function is turned on.
MioShare Website
Connect with Komoot:
- You must first register Komoot account in advance.
- Log in to MioShare, open the account page, navigate to the orange button in the upper right corner of screen
- Select the synchronization settings
- Select "Link my account" next to the Komoot logo.
- Log in to Komoot and click the "Grant access" button
As soon as you see that the account has been successfully linked, the recordings of your Cyclos are automatically synchronized with your Komoot account.
Connect with RouteYou:
- You must first set up a RouteYou account.
- Check your MioShare account mailbox and follow the instructions to complete the connection process.
Your Cyclo's recordings are automatically synchronized with your RouteYou account.
Connect with STRAVA Route:
- You must first set up a STRAVA premium account.
- Log in to MioShare, open the account page, navigate to the orange button in the upper right corner of screen.
- Select the Synchronization Settings.
- Select "Link my account" next to the STRAVA logo.
- Log in to STRAVA and click the "Log in" button.
- When you see the authorization page, please do not uncheck any item in case of missing data. Press the "Authorize" button to link the accounts.
As soon as you see that the account has been successfully linked, the recordings of your Cyclos are automatically synchronized with your STRAVA account.
* Please make sure that the "Auto Route Download" function is turned on.
MioShare will ONLY sync your "latest 20" STRAVA Routes to save your Cyclo device memory space.
Connecting Shimano STEPS
If you ride an e-bike with Shimano STEPS*, connect it with your Cyclo to enable a safe and enjoyable e-cycling experience.
* Shimano STEPS series supported: SC-E6100 / SC-E7000 / SC-EM800 / EW-EN100.
- Power up your e-bike and have your Cyclo Discover Pal ready for set up connection.
- On your Cyclo, go to Settings > Connections > Sensor and tap "+".
- Follow the on-screen prompts to complete the connection.
*Notice:
- Tap the Shimano STEPS item to access more details of the sensor.
- To disconnect, go to Settings > Connections > Sensor > Shimano STEPS and tap "Remove".
Viewing the Shimano STEPS dashboard screen
When connected, go to Settings > Activity Profile > E-Bike > Dashboard > Shimano STEPS and tap the Show screen switch button to enable the function. Tap Layout & Data Fields to customise the screen layout.
During your trip, the Shimano STEPS screen displays the e-bike information such as the battery level, travel time, speed, etc.
Using Surprise Me™ with Shimano STEPS
Once your Cyclo connected to Shimano STEPS, Surprise Me™ will offer you the routes based on the battery level of the e-bike.

Maintaining your device
Maintaining your device
Download and use MioShare App for device management:
Mio offers its Cyclo customers free map and software update. Connect your Cyclo device to MioShare App and check out latest update for better user experience.
- Make sure your Cyclo device is connected to the MioShare App.
- Go to "Settings" on main menu of your Cyclo device: Settings > Device Management > Software Updates
- Tap "Check Device S/W Update" to get the latest update.

Warranty Registration
By default you'll receive a 2 year warranty
Don't forget to register your device on the Mio website to activate your warranty
- Go to Mio.com
- Select your country in the top right corner
- Click on the Register / Login button in the top right corner.
- After logging in, click the same button again and choose 'My Account'.
- Select 'My Devices' on the left side of the account page.
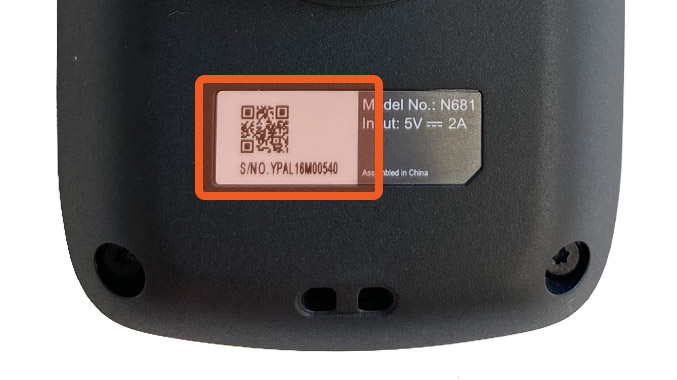
- Enter the required information and click on the Add button. The serial numbers are on the back of your Cyclo device.

Unlocking the screen
To prevent being disturbed by rain drop, your device will automatically lock the screen after 1 minute (by default) under map view.
When the screen is locked, simply press the POWER button to unlock the screen.
You can change the screen lock setting by tapping Main menu > Settings > System > Screen > Screen Lock Timer.